Jelly nail polish is a sheer, translucent nail color that creates a stained-glass effect on your nails — glossy, buildable, and subtly revealing the natural nail underneath. Unlike opaque polishes that completely cover, jelly nail polish lets light pass through, giving a plump, dimensional, almost candy-like appearance that’s been dominating TikTok and Instagram since late 2024. It’s surprisingly versatile, flattering on all nail lengths, and easier to apply than you might expect once you understand the technique.
Jelly nail polish — if you’ve scrolled through beauty TikTok or Instagram Reels lately, you’ve definitely seen it. Those impossibly glossy, see-through nails that look like stained glass, hard candy, or the surface of a perfectly ripe grape. They’re not quite nude, not quite sheer, and definitely not opaque. They occupy this dreamy middle ground where color exists but transparency reigns, and somehow that combination feels incredibly fresh and modern.
I first noticed the trend when a nail artist I follow posted a set of cherry-red jelly nails that looked so juicy I actually wanted to bite them. That’s the thing about this finish — it has a tactile, almost edible quality that opaque polishes just can’t replicate. The light hits differently. The color glows from within rather than sitting on top. And the best part? You don’t need salon-perfect skills or expensive equipment to pull it off at home.
After months of experimenting with different brands, colors, and layering techniques, I’ve cracked the code on getting that perfect jelly finish. In this guide, I’m sharing everything — what jelly polish actually is, how it differs from regular sheer polish, which brands nail the formula, application tricks that make a difference, and all the creative ways to wear this trend. Whether you’re a nail art newbie or a polish collector with three hundred bottles, there’s something here for you.
Table of Contents
- What Is Jelly Nail Polish?
- Jelly vs Sheer vs Opaque: What’s the Difference?
- Why Jelly Nail Polish Went Viral
- Best Jelly Nail Polish Brands
- How to Apply Jelly Nail Polish Like a Pro
- Creative Jelly Nail Art Ideas
- How to Make Any Polish Into a Jelly Finish
- Jelly Nails for Different Nail Types
- Removal and Care Tips
- FAQs
- Final Thoughts
What Is Jelly Nail Polish?
Jelly nail polish is a specific category of nail color characterized by its translucent, buildable formula. The name comes from its resemblance to gelatin desserts — that same glossy, slightly see-through, bouncy appearance that lets light penetrate and reflect off the natural nail underneath.
The formula typically contains less pigment than traditional nail polish, suspended in a clear base that creates depth rather than coverage. When you apply one coat, you get a subtle wash of color. Add a second or third, and the intensity builds while still maintaining that characteristic transparency. It’s never meant to be fully opaque — the whole point is the layered, dimensional effect.
What makes jelly polish distinct from other sheer or tinted products is the gloss factor. A true jelly finish is high-shine, almost wet-looking, even without a separate top coat. The polish formula itself contains ingredients that enhance reflectivity, giving that “just got a professional manicure” gleam that lasts.
The texture also tends to be slightly thicker than standard polish — not gloopy, but substantial. This helps it self-level on the nail, filling in minor ridges and creating that smooth, plump appearance. It’s forgiving in a way that thin, watery sheers often aren’t.
Jelly vs Sheer vs Opaque: What’s the Difference?
These terms get thrown around interchangeably, but they describe genuinely different finishes. Understanding the distinction helps you choose the right product for your desired look.
Jelly Nail Polish:
- Coverage: Translucent to semi-sheer, never fully opaque
- Finish: High-gloss, wet-looking, dimensional
- Layers: Buildable — 1-3 coats deepen color while maintaining transparency
- Best for: Stained-glass effect, natural nail visibility, trendy manicures
- Examples: Cirque Colors Jelly collection, ILNP Jelly finishes
Sheer Nail Polish:
- Coverage: Very light tint, often barely visible
- Finish: Can be glossy, satin, or matte depending on formula
- Layers: Multiple coats may never build to noticeable color
- Best for: French manicure bases, barely-there color, office-appropriate looks
- Examples: Traditional “sheer pink” polishes, tinted nail strengtheners
Opaque Nail Polish:
- Coverage: Full, solid color in 1-2 coats
- Finish: Any finish — creme, shimmer, matte, metallic
- Layers: Additional coats deepen or intensify but don’t change transparency
- Best for: Bold color statements, nail art bases, classic manicures
- Examples: Standard creme polishes, most mainstream nail colors
The key difference between jelly and sheer is intensity. A sheer polish whispers. A jelly polish speaks clearly while still letting the room show through. If sheer is a tinted moisturizer, jelly is a light-coverage foundation with a dewy finish — there’s substance and glow, not just a hint.
Why Jelly Nail Polish Went Viral
Trends don’t explode without reason, and jelly nails hit at a perfect cultural moment. Here’s why they caught fire so fast.
The “Clean Girl” Aesthetic Evolution
The clean girl aesthetic — minimal makeup, slicked-back hair, natural brows — dominated 2023 and 2024. But by late 2024, people started craving a version with more personality. Jelly nails fit perfectly: they’re polished and refined like a nude manicure, but with a playful, colorful twist. It’s clean girl with a candy-coated edge.
Social Media Friendly
Jelly nails photograph incredibly well. The translucency catches light in ways that create depth and interest even in quick phone snapshots. They look expensive and artistic without requiring actual nail art skills. For influencers and everyday posters alike, that’s gold.
Nail Health Awareness
The past few years have seen a huge shift toward nail health over extreme length and elaborate acrylics. Jelly polish celebrates the natural nail — its color, its shape, its texture. You don’t need extensions or overlays to make this look work. In fact, it looks best on healthy, well-maintained natural nails.
Nostalgia Factor
There’s something distinctly Y2K and early 2000s about jelly textures — reminiscent of Lip Smackers, jelly sandals, and those translucent colored iMacs. As millennial and Gen Z nostalgia cycles continue, this aesthetic feels both fresh and comfortingly familiar.
Accessibility
Unlike intricate nail art that requires steady hands and professional tools, jelly nails are genuinely achievable at home. The forgiving formula, the lack of need for perfect opacity, and the glossy self-leveling quality make it beginner-friendly.
Best Jelly Nail Polish Brands
Not every brand that calls something “jelly” actually delivers the right formula. These are the ones that consistently nail the finish.
Cirque Colors — Jelly Collection
The gold standard. Their jelly polishes are specifically formulated for this effect, with the perfect pigment-to-clear-base ratio. Colors like “Marsala Jelly” and “Rose Jelly” have achieved cult status. Around $13 per bottle.
ILNP — Jelly Finishes
Known for holographic polishes, ILNP’s jelly line brings that same quality to translucent colors. Their jellies often include subtle shimmer that adds dimension without compromising the see-through effect. Around $10-12 per bottle.
OPI — Sheer Tints
While not marketed as “jelly,” OPI’s sheer tints like “Passion” and “Bubble Bath” can achieve a similar effect with careful application. More accessible price point at $9-11 and widely available in drugstores.
Essie — Gel Couture Sheers
The Gel Couture line has several shades that layer beautifully into a jelly finish. “Spool Me Over” and “Lace Me Up” are standouts. The brush is excellent for smooth application.
Korean Indie Brands
Brands like Romand, Peripera, and 3CE have been doing jelly nails since before the Western trend caught on. Their formulas tend to be thinner and more watery, requiring more coats but delivering an incredibly glassy finish. Often available through K-beauty retailers.
DIY Approach
Mixing your own jelly polish is surprisingly effective. More on that in the dedicated section below, but for now, know that a clear polish base plus a few drops of opaque color can create custom jellies at a fraction of the cost.
How to Apply Jelly Nail Polish Like a Pro
The application technique matters more with jelly polish than with opaque colors. Here’s my tested method for that perfect, salon-quality finish.
Prep Work (Don’t Skip This)
Start with clean, dry nails. Remove all old polish and oils using a non-acetone remover — acetone can dehydrate nails and cause polish to chip faster. Push back cuticles gently with an orange stick. Lightly buff the nail surface to remove shine — this gives the polish something to grip. Wipe with rubbing alcohol or nail dehydrator to remove all residue.
Apply a thin layer of base coat. This is non-negotiable. Jelly polishes are often more pigmented than they look, and a good base coat prevents staining — especially important with reds, berries, and dark jellies. Let it dry completely, about 60 seconds.
The Jelly Application
Coat One: Apply a thin, even layer of jelly polish. Don’t worry if it looks streaky or barely there — that’s normal. The key is even distribution, not coverage. Cap the free edge (brush horizontally across the nail tip) to seal color and prevent chipping. Let dry for 2-3 minutes.
Coat Two: Apply a second thin layer, slightly thicker than the first. You’ll start seeing the color build and the jelly effect emerge. Again, cap the free edge. Dry for 2-3 minutes.
Coat Three (Optional): For deeper color intensity while maintaining transparency, add a third thin coat. This is where personal preference comes in — some people love the subtle one-coat look, others want that saturated stained-glass depth. Dry completely.

Top Coat: Apply a generous layer of high-gloss top coat. This amplifies the jelly effect enormously, creating that wet, dimensional look. For extra durability, use a gel-effect top coat or a quick-dry formula. Cap the free edge again.
Pro Tips for Perfection
Thin coats are everything. Thick coats take forever to dry, bubble easily, and actually look less glossy. Patience with thin layers pays off.
Don’t shake the bottle. Roll it between your palms instead. Shaking introduces air bubbles that show up as tiny dots in your jelly finish.
Use a quality brush. The brush that comes with your polish matters. Wide, flat brushes distribute product more evenly than thin, round ones. If your polish has a bad brush, decant into a bottle with a better one.
Clean up before it dries. Jelly polish can stain skin if it pools around the cuticle. Use a small brush dipped in remover to clean up edges while the polish is still wet.
Let it cure. Even if the surface feels dry, jelly polish needs time to fully harden. Avoid hot water, tight shoes, or heavy hand use for at least an hour after application.
Creative Jelly Nail Art Ideas
Once you’ve mastered basic jelly application, the creative possibilities open up. Here are my favorite ways to elevate the trend.
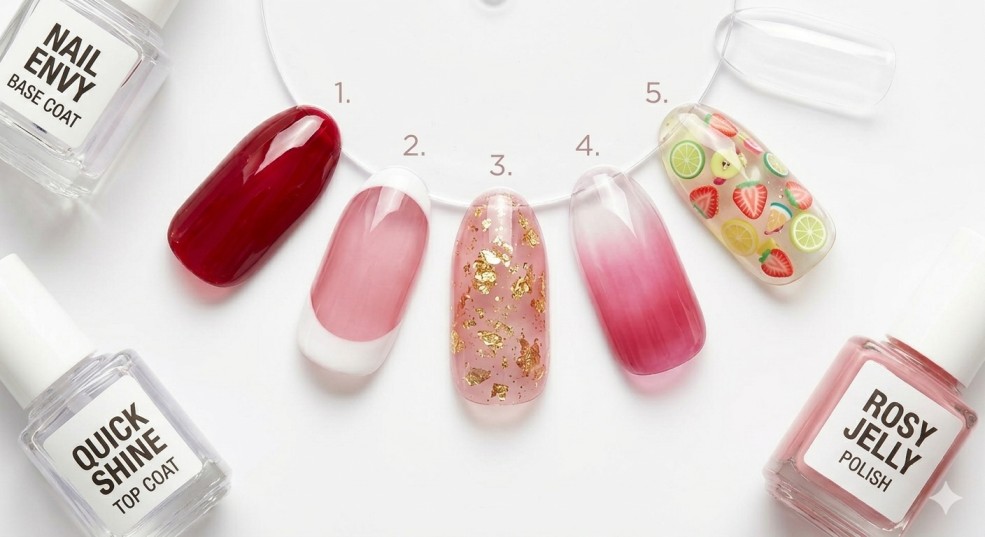
The Jelly Sandwich
Layer a glitter or foil polish between two coats of jelly. The glitter peeks through the translucent color like suspended confetti. Use iridescent flakes for an ethereal look, or gold foil for something more luxe.
Jelly French Tips
Apply a nude or pink jelly as a base, then add a sheer white or colored jelly tip. The result is a soft, modern French manicure that looks nothing like the stark white tips of the 2000s.
Color Blocking with Jellies
Use two different jelly colors on alternating nails, or create geometric sections using tape. The transparency means colors can overlap slightly without looking muddy — a design advantage unique to this finish.
Jelly Gradient
Apply a darker jelly at the base of the nail and a lighter shade toward the tip, blending where they meet. The translucent quality makes the gradient incredibly smooth and seamless.
Embedded Elements
Place small dried flowers, foil shapes, or nail charms onto a wet base coat, then seal with jelly polish layers. The objects appear suspended in the color like specimens in amber.
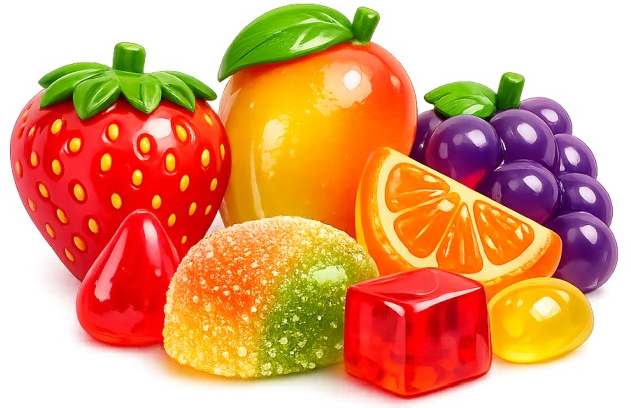
The “Fruit Jelly” Look
Match your jelly color to actual fruit — strawberry red, grape purple, lemon yellow, lime green. Add a glossy top coat and you’ve got nails that look good enough to eat. This was the original viral trend that launched jelly nails into the mainstream.
How to Make Any Polish Into a Jelly Finish
Don’t want to buy new polishes? You can transform almost any color into a jelly with this simple technique.
The Mixing Method:
- Pour a small amount of clear polish or nail polish thinner into a clean empty bottle or mixing tray
- Add 1-2 drops of opaque polish
- Mix thoroughly with a toothpick or nail art brush
- Test on a nail wheel or paper until you achieve desired transparency
The Layering Method:
- Apply one thin coat of your chosen color
- Immediately follow with a thin coat of clear polish while the color is still slightly wet
- The clear polish will pull some pigment with it, creating a diffused, jelly-like effect
The Sheer Coat Method:
- Apply your opaque color as normal
- Once completely dry, apply a single thin coat of the same color mixed with equal parts clear polish
- This creates a translucent veil over the opaque base
Best Colors to Convert:
- Reds and berries (classic cherry and strawberry jellies)
- Deep purples (grape jelly effect)
- Bright pinks (watermelon and bubblegum vibes)
- Teals and blues (ocean glass effect)
- Oranges and corals (citrus and sunset looks)
Avoid very dark colors like black or deep navy — they tend to look muddy rather than translucent when sheered out.
Jelly Nails for Different Nail Types
One of the best things about this trend is its adaptability. Here’s how to make it work for your specific nail situation.
Short Nails:
Jelly polish is actually ideal for short nails. The transparency doesn’t overwhelm small nail beds, and the glossy finish makes nails look healthier and more substantial. Stick to lighter, brighter jellies — dark colors can make short nails appear even smaller.
Long Nails:
You have the most canvas to play with. Try jelly gradients, embedded elements, or the jelly sandwich technique. Long nails also carry deeper jelly colors beautifully — that stained-glass effect really shines with more surface area.
Weak or Damaged Nails:
The jelly trend celebrates natural nails, but if yours are struggling, use a ridge-filling base coat before application. The self-leveling quality of jelly polish will help camouflage imperfections. Avoid peeling or splitting by keeping nails shorter while they recover.
Wide Nail Beds:
Use the jelly French tip technique or vertical color blocking to create the illusion of narrower nails. The transparency means you can play with negative space in ways that opaque polish doesn’t allow.
Narrow Nail Beds:
Horizontal designs and all-over jelly color work best. The glossiness adds visual width, and avoiding stark lines prevents emphasizing narrowness.
Bitten or Uneven Nails:
Jelly polish is more forgiving than opaque colors because it doesn’t create a solid field that draws attention to imperfections. The dimensional quality actually distracts from uneven edges. Use a nude-toned jelly for the most natural camouflage.
Removal and Care Tips
Jelly polish might look delicate, but it wears surprisingly well with proper care. Here’s how to maximize longevity and remove safely.
Making It Last:
- Reapply top coat every 2-3 days to refresh gloss and prevent chipping
- Wear gloves for dishwashing and cleaning — hot water and chemicals are polish’s enemy
- Use cuticle oil daily; healthy nail beds mean better polish adhesion
- Avoid using nails as tools (opening cans, scraping labels)
- Apply a thin layer of polish along the free edge every few days to seal against chips
Removal:
Even though jelly polish is often light in color, it can still stain if worn for extended periods. Use a non-acetone remover for gentle removal, or acetone if you’re in a hurry. Soak a cotton pad, press it to the nail for 10 seconds, then wipe away rather than scrubbing aggressively.
For stubborn glitter or embedded elements in jelly sandwiches, use the foil method: soak cotton in remover, place on the nail, wrap with aluminum foil, and wait 5-10 minutes. The polish will slide off easily.
Post-Manicure Nail Care:
Jelly polish doesn’t damage nails, but the removal process can. After taking off jelly color, apply a nourishing nail oil or cream. Give nails a day or two of bare breathing time before the next application. If you’re doing jelly manicures frequently, consider a keratin strengthener between polishes.
FAQs
What is jelly nail polish?
Jelly nail polish is a translucent, buildable nail color that creates a glossy, see-through finish similar to gelatin or stained glass. Unlike opaque polishes that fully cover the nail, jelly polish allows the natural nail to show through while adding a wash of dimensional color.
How is jelly nail polish different from sheer polish?
Jelly polish has more pigment and a higher-gloss formula than sheer polish, creating a deeper, more dimensional color while still maintaining transparency. Sheer polishes are typically lighter, sometimes matte or satin, and often barely visible even after multiple coats. Jelly polishes are specifically designed to build to a noticeable, glossy, translucent finish.
Can I make jelly nail polish at home?
Yes, you can create a jelly finish by mixing a few drops of opaque nail polish into clear polish or nail polish thinner. You can also layer a thin coat of clear polish over wet opaque color to diffuse the pigment. However, commercially formulated jelly polishes have optimized pigment suspension and gloss agents that are difficult to fully replicate at home.
How many coats of jelly nail polish should I apply?
Most jelly nail polishes look best with 2-3 thin coats. One coat gives a subtle wash of color, two coats build noticeable intensity while maintaining transparency, and three coats create the deepest stained-glass effect. Avoid thick coats as they take longer to dry and can bubble or lose glossiness.
Does jelly nail polish chip easily?
Jelly nail polish wears similarly to other high-gloss polishes — typically 5-7 days with normal activity. Using a quality base coat and top coat, capping the free edge during application, and avoiding harsh chemicals or hot water extends wear time significantly. The jelly finish itself doesn’t inherently chip more than other polish types.
What are the best colors for jelly nail polish?
Classic jelly colors include cherry red, strawberry pink, grape purple, lemon yellow, and lime green. Nude and blush pink jellies are universally flattering for everyday wear. For trendy statement looks, try teal, coral, or multi-colored jelly nail art. Darker jellies like burgundy and navy work beautifully in fall and winter.
Final Thoughts
Jelly nail polish is more than a fleeting TikTok trend — it’s a genuinely versatile, flattering, and achievable manicure style that deserves a permanent place in your polish collection. The combination of gloss, transparency, and buildable color creates something that feels both nostalgic and completely current, playful and sophisticated.
What I appreciate most about this trend is its accessibility. You don’t need acrylics, extensions, or professional training. You don’t need expensive tools or hours of free time. With the right polish, a steady hand, and a little patience with thin coats, you can achieve a manicure that looks editorial and expensive.
My recommendation? Start with a classic red or pink jelly from a reputable brand like Cirque Colors or ILNP. Master the two-coat application with a glossy top coat. Once you’re comfortable, branch into color blocking, jelly sandwiches, or custom mixing. The forgiving nature of this finish means experimentation is low-risk and high-reward.
Whether you’re drawn to the trend for its aesthetic appeal, its nail-health-friendly approach, or simply because you want something different from the opaque cremes in your collection, jelly polish delivers. It’s the rare beauty trend that actually lives up to its hype.
Give it a try. I suspect that once you experience that first perfect, glossy, light-catching jelly manicure, you’ll understand exactly why the internet can’t stop talking about it.